User and Group Provisioning
Hive Console supports SCIM 2.0 for automatically provisioning and deprovisioning organization users and groups from an identity provider such as Okta or Microsoft Entra ID.
General availability for this feature is expected in September. If you'd like to try the feature before then, please reach out so we can enable it for your organization.
SCIM provisioning complements Single Sign-On (SSO):
- OIDC authenticates users
- SCIM controls which users exist, whether they are active, their group memberships, and the permissions they receive in Hive Console
How Permissions Work
Hive Console does not assign roles directly to SCIM-provisioned users. Instead, it synchronizes groups from your identity provider and lets you create one or more role mappings for each group. Each mapping combines a Hive role with either all organization resources or a specific selection of projects, targets, services, and app deployments.
A user's effective permissions are the combination of all mappings from all of their groups. This allows you to model access such as:
- Viewer access to every project through one group
- Schema check approval for selected services through another group
- Different roles for different projects through multiple mappings on the same group
Prerequisites
Before configuring SCIM, you need:
- An OIDC provider connected to the organization
- Each email domain used by provisioned users registered and verified in the OIDC configuration
- Permission to manage organization access tokens, OIDC settings, members, and group mappings
- A SCIM 2.0 integration in your identity provider (Okta, Entra ID etc.) that supports user and group provisioning
Provisioned users sign in through the organization's OIDC provider. SCIM does not provide an authentication method by itself.
Configure SCIM Provisioning
Match SCIM and OIDC User Identities
Hive Console matches an OIDC login to a provisioned user by comparing the configured OIDC User
ID Claim with the user's SCIM externalId.
In your identity provider, configure the SCIM externalId attribute and an OIDC claim to return the
same stable, unique value for a user. Then open your organization Settings, manage the OIDC
provider, and set User ID Claim to the name of that OIDC claim.
If no User ID Claim is is configured, Hive Console uses the standard OIDC sub claim. This works when your
identity provider sends the same value as the synced SCIM externalId.
Do not use an attribute that can change, such as an email address, unless your
identity provider guarantees its stability. If the OIDC claim does not match
the SCIM externalId, the provisioned user cannot sign in.
Create a Provisioning Access Token
Create an organization access token for the identity provider:
- Open your organization Settings and select Access Tokens.
- Create an organization access token with a descriptive name and an expiration policy appropriate for your organization.
- In the SCIM permission group, select Provision users and groups (
scim:provision). - Do not grant unrelated permissions.
- Copy the token when it is displayed and store it in your identity provider.
The token identifies the organization that receives the provisioned users and groups.
Configure the Identity Provider
Create or open the SCIM 2.0 integration in your identity provider and enter these values:
| Setting | Hive Cloud value |
|---|---|
| Base URL / Tenant URL | https://api.graphql-hive.com/scim/v2/ |
| Authentication | Bearer token / HTTP header |
| Token | The organization access token created in the previous step |
Enable the provisioning actions required by your organization. Hive Console supports creating, reading, updating, disabling, and re-enabling users, as well as creating, reading, updating, and deleting groups and synchronizing their memberships.
Use your identity provider's connection test before assigning users or groups. If the test fails,
verify that the token is sent as Authorization: Bearer <ACCESS_TOKEN> and includes the
scim:provision permission.
Provision Users and Groups
Assign users and groups to the Hive Console integration in your identity provider, then start a provisioning sync.
Provisioned users appear in the organization Members page with a SCIM indicator. Their active state and group memberships are controlled by the identity provider. Synchronized groups appear under Members > Groups.
If a user is provisioned without any mapped group, the user exists in Hive Console but receives no permissions from group mappings.
Assign Roles and Resources to Groups
Open your organization Members page and select Groups. For each synchronized group:
- Expand the group.
- Select Add role mapping.
- Select a predefined or custom Hive role.
- Grant the role on all resources or select the projects, targets, services, and app deployments to which it applies.
- Select Create Role Assignment.
You can add multiple mappings to a group and edit or remove existing mappings. Changes apply to all active users in the group.
Groups themselves, their names, and their memberships remain managed by the identity provider and cannot be created manually in Hive Console.
Require SCIM Provisioning
After you have successfully tested provisioning and assigned the required group mappings, open the organization's OIDC settings. In User Provisioning, select Managed via SCIM.
This restricts organization access to active users that were provisioned through SCIM. Organization administrators are excluded from this restriction to preserve administrative access.
Enable this setting only after provisioning at least one test user and confirming that the user can sign in and receives the expected permissions.
Managing Provisioned Users
The identity provider is the source of truth for SCIM-provisioned users. Use it to change a user's email, display name, active state, or group memberships.
To revoke access, unassign or deactivate the user in the identity provider. Hive Console disables the user, invalidates existing access, and prevents new sign-ins until the user is re-enabled through SCIM.
To keep identity management centralized and prevent conflicting state, a provisioned user:
- Cannot have a role or resources assigned directly in Hive Console
- Cannot update their Hive Console profile directly
- Cannot be removed from or leave the provisioning organization directly
- Cannot create or join another Hive Console organization
- Cannot receive ownership of the organization
Personal access tokens created by a provisioned user remain limited by the user's current group mappings. Deactivating the user or reducing their group permissions also restricts those tokens.
Integration Guides
These guides help setting up common providers with Hive Console.
Microsoft Entra ID
As of July 29, 2026, SCIM group provisioning requires a Microsoft Entra ID P1 plan or higher. Group provisioning is not available on the Free plan.
Create or Select an Enterprise Application
In the Microsoft Entra admin center, open Enterprise applications and select New application. You can also use the enterprise application that already provides OIDC SSO for your Hive organization.
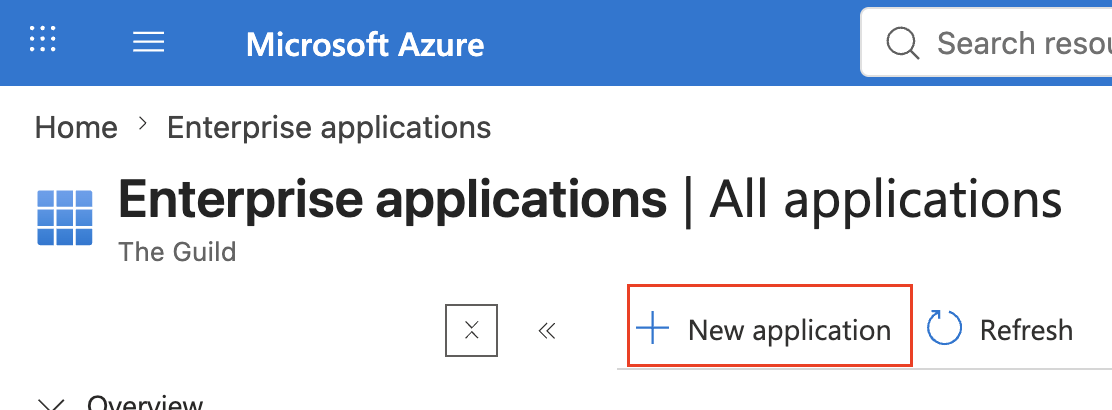
On the Browse Microsoft Entra Gallery page, select Create your own application.
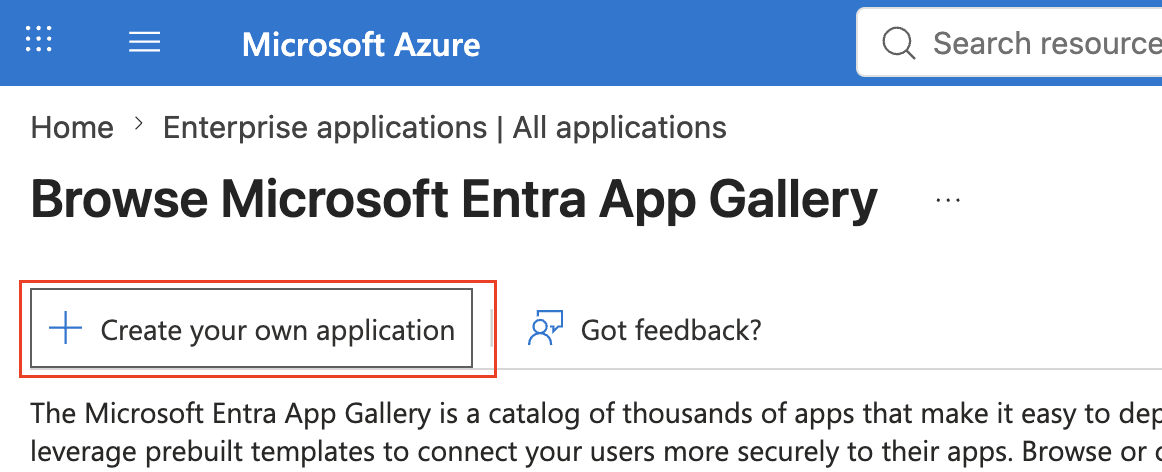
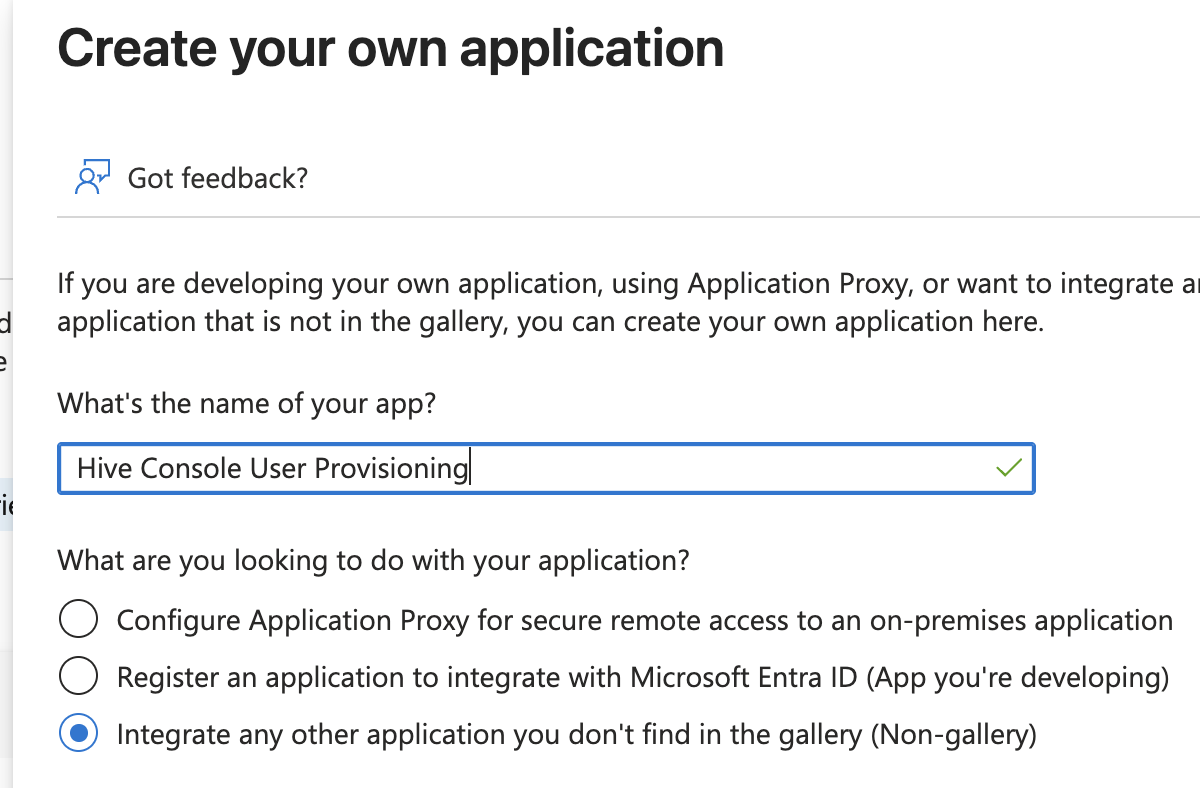
Enter a descriptive name, select the option to integrate an application not found in the gallery, and create the application.
Configure the SCIM Connection
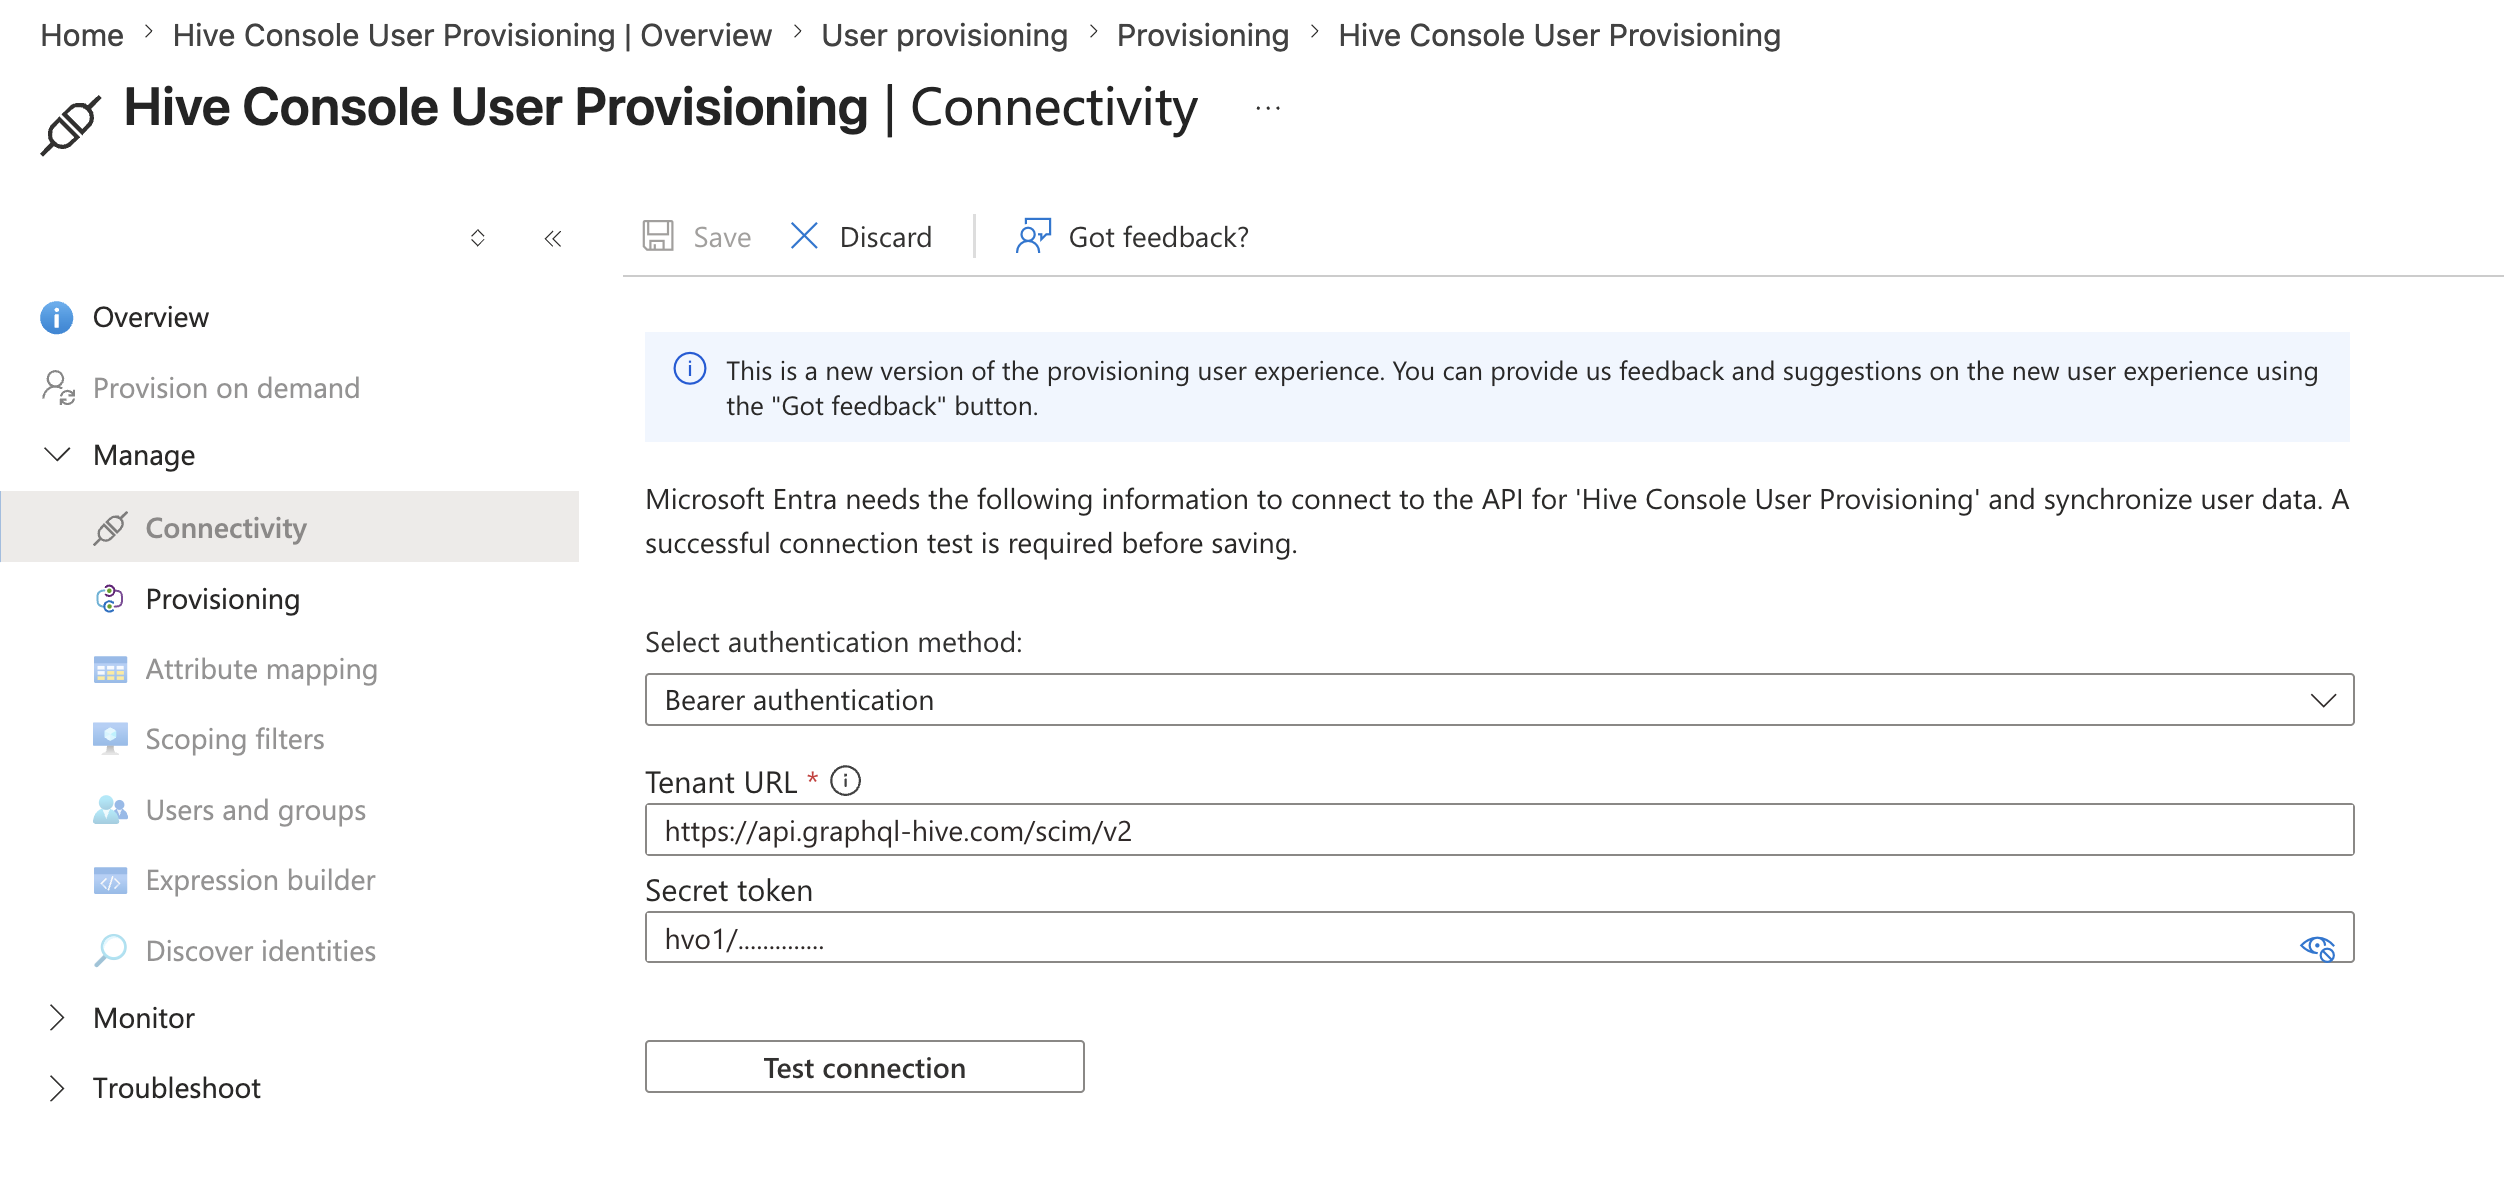
Open the application's provisioning settings, then open Connectivity and enter these values:
| Setting | Value |
|---|---|
| Authentication method | Bearer authentication |
| Tenant URL | https://api.graphql-hive.com/scim/v2/ |
| Secret token | An organization access token with scim:provision granted |
Test the connection, then save the configuration.
Configure User Attribute Mappings
Open Attribute mapping, select Users, and configure these mappings:
| Source attribute | Target attribute | Mapping type | Matching precedence |
|---|---|---|---|
userPrincipalName | userName | Direct | |
userPrincipalName | externalId | Direct | 1 |
Switch([IsSoftDeleted], , "False", "True", "True", "False") | active | Expression | |
mail | emails[type eq "work"].value | Direct |
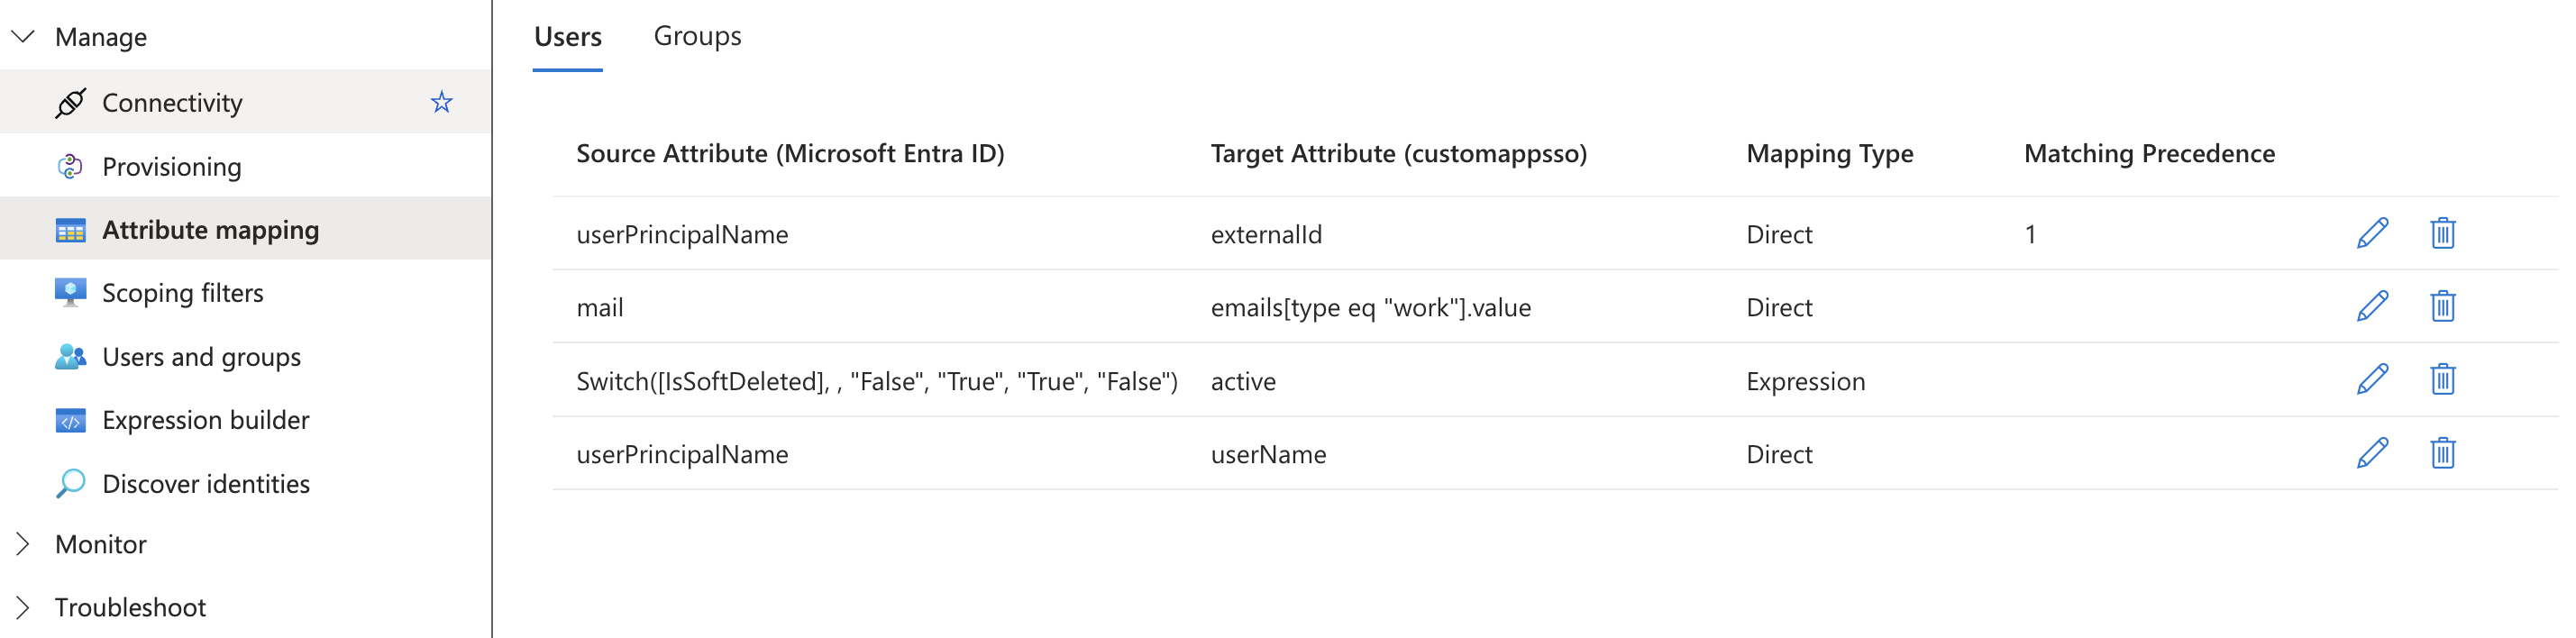
This configuration uses userPrincipalName as the SCIM externalId. Ensure that the OIDC claim
configured as Hive Console's User ID Claim returns the same value, as described in
Match SCIM and OIDC User Identities.
Configure Group Attribute Mappings
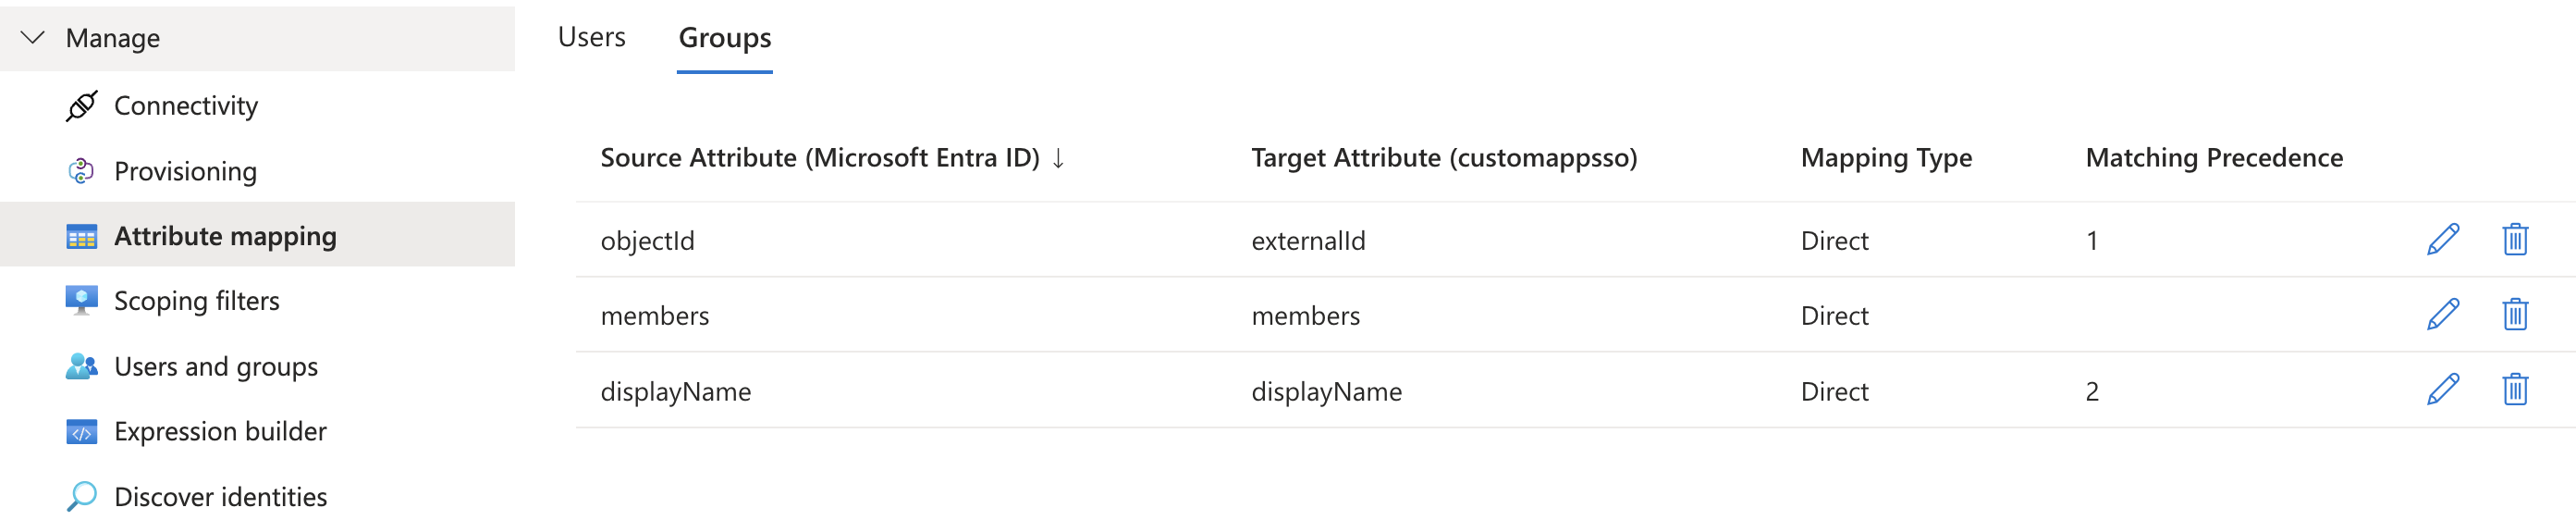
On the Attribute mapping page, select Groups and configure these mappings:
| Source attribute | Target attribute | Mapping type | Matching precedence |
|---|---|---|---|
objectId | externalId | Direct | 1 |
members | members | Direct | |
displayName | displayName | Direct | 2 |
Configure the Provisioning Scope
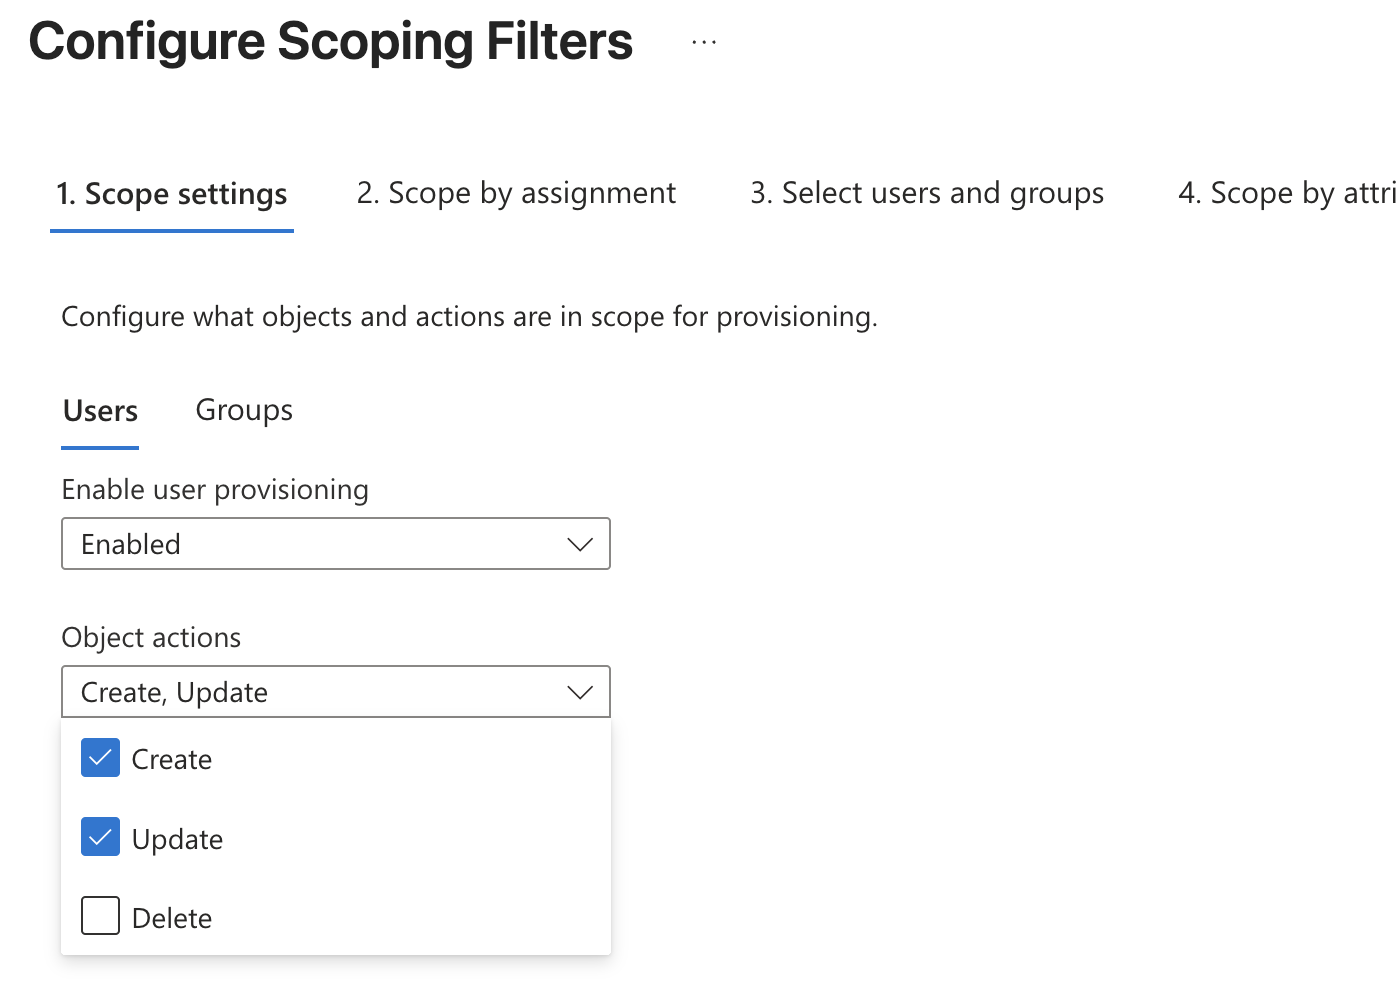
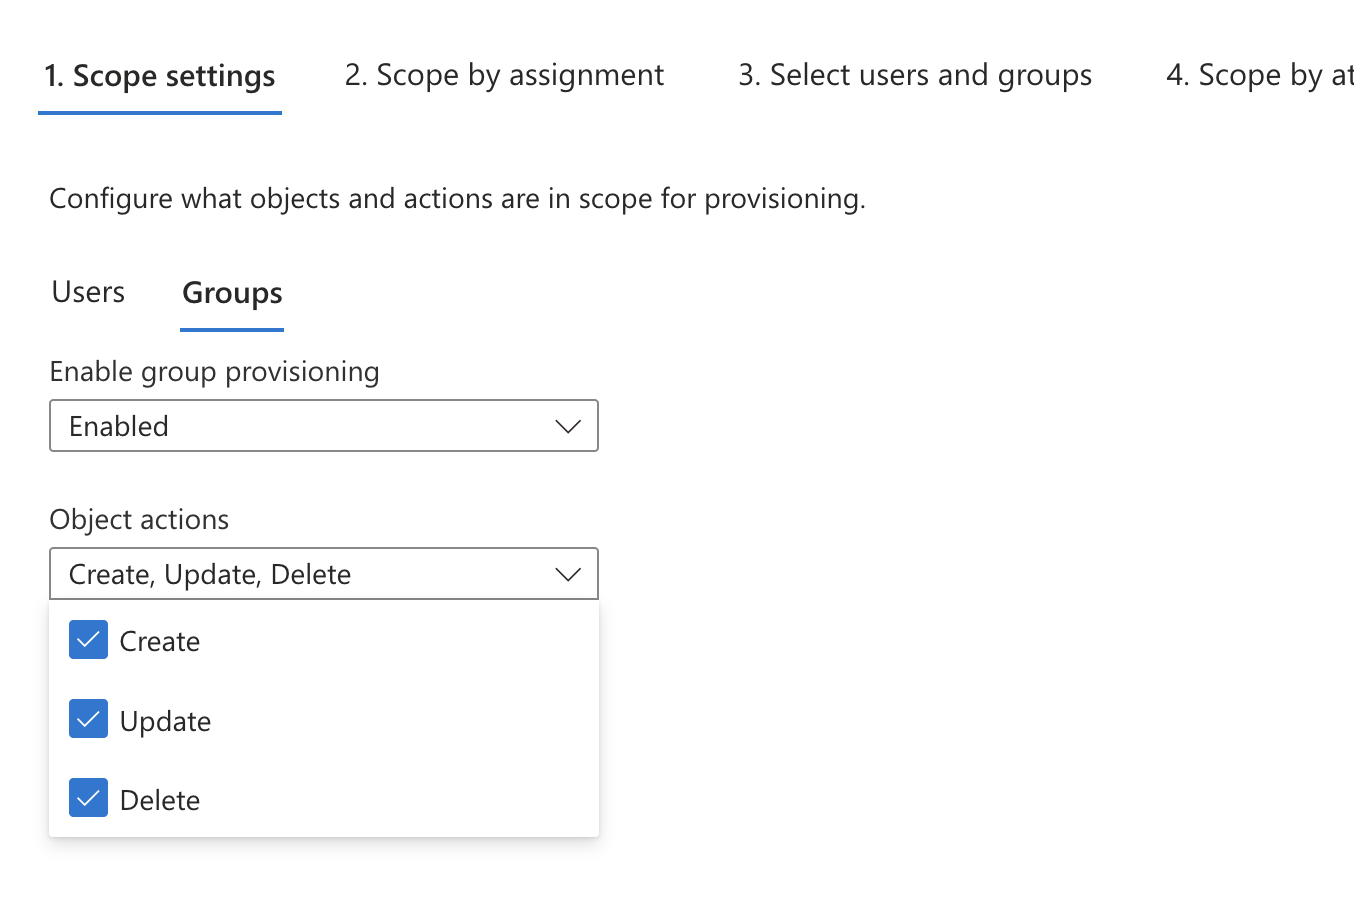
Open Scoping filters and edit the scope settings. Enable user and group provisioning, then select these object actions:
- For users, select Create and Update.
- For groups, select Create, Update, and Delete.
Save the configuration.
Assign Users and Groups
Assign the users and groups that you want to provision to the enterprise application, then enable provisioning. The initial synchronization can take some time. When it finishes, the provisioned users and groups appear in Hive Console.
Open Members > Groups in Hive Console and create the required role mappings for each provisioned group.
Okta
Create an App Integration
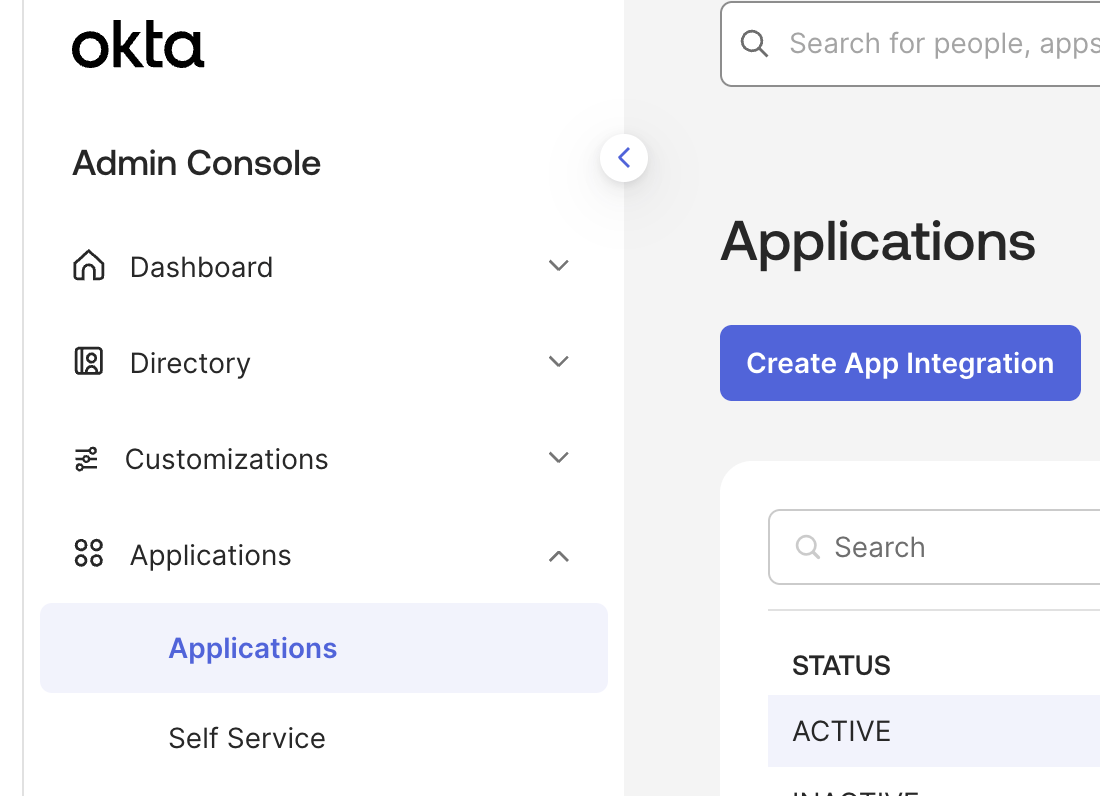
In the Okta Admin Console, open Applications > Applications and select Create App Integration.
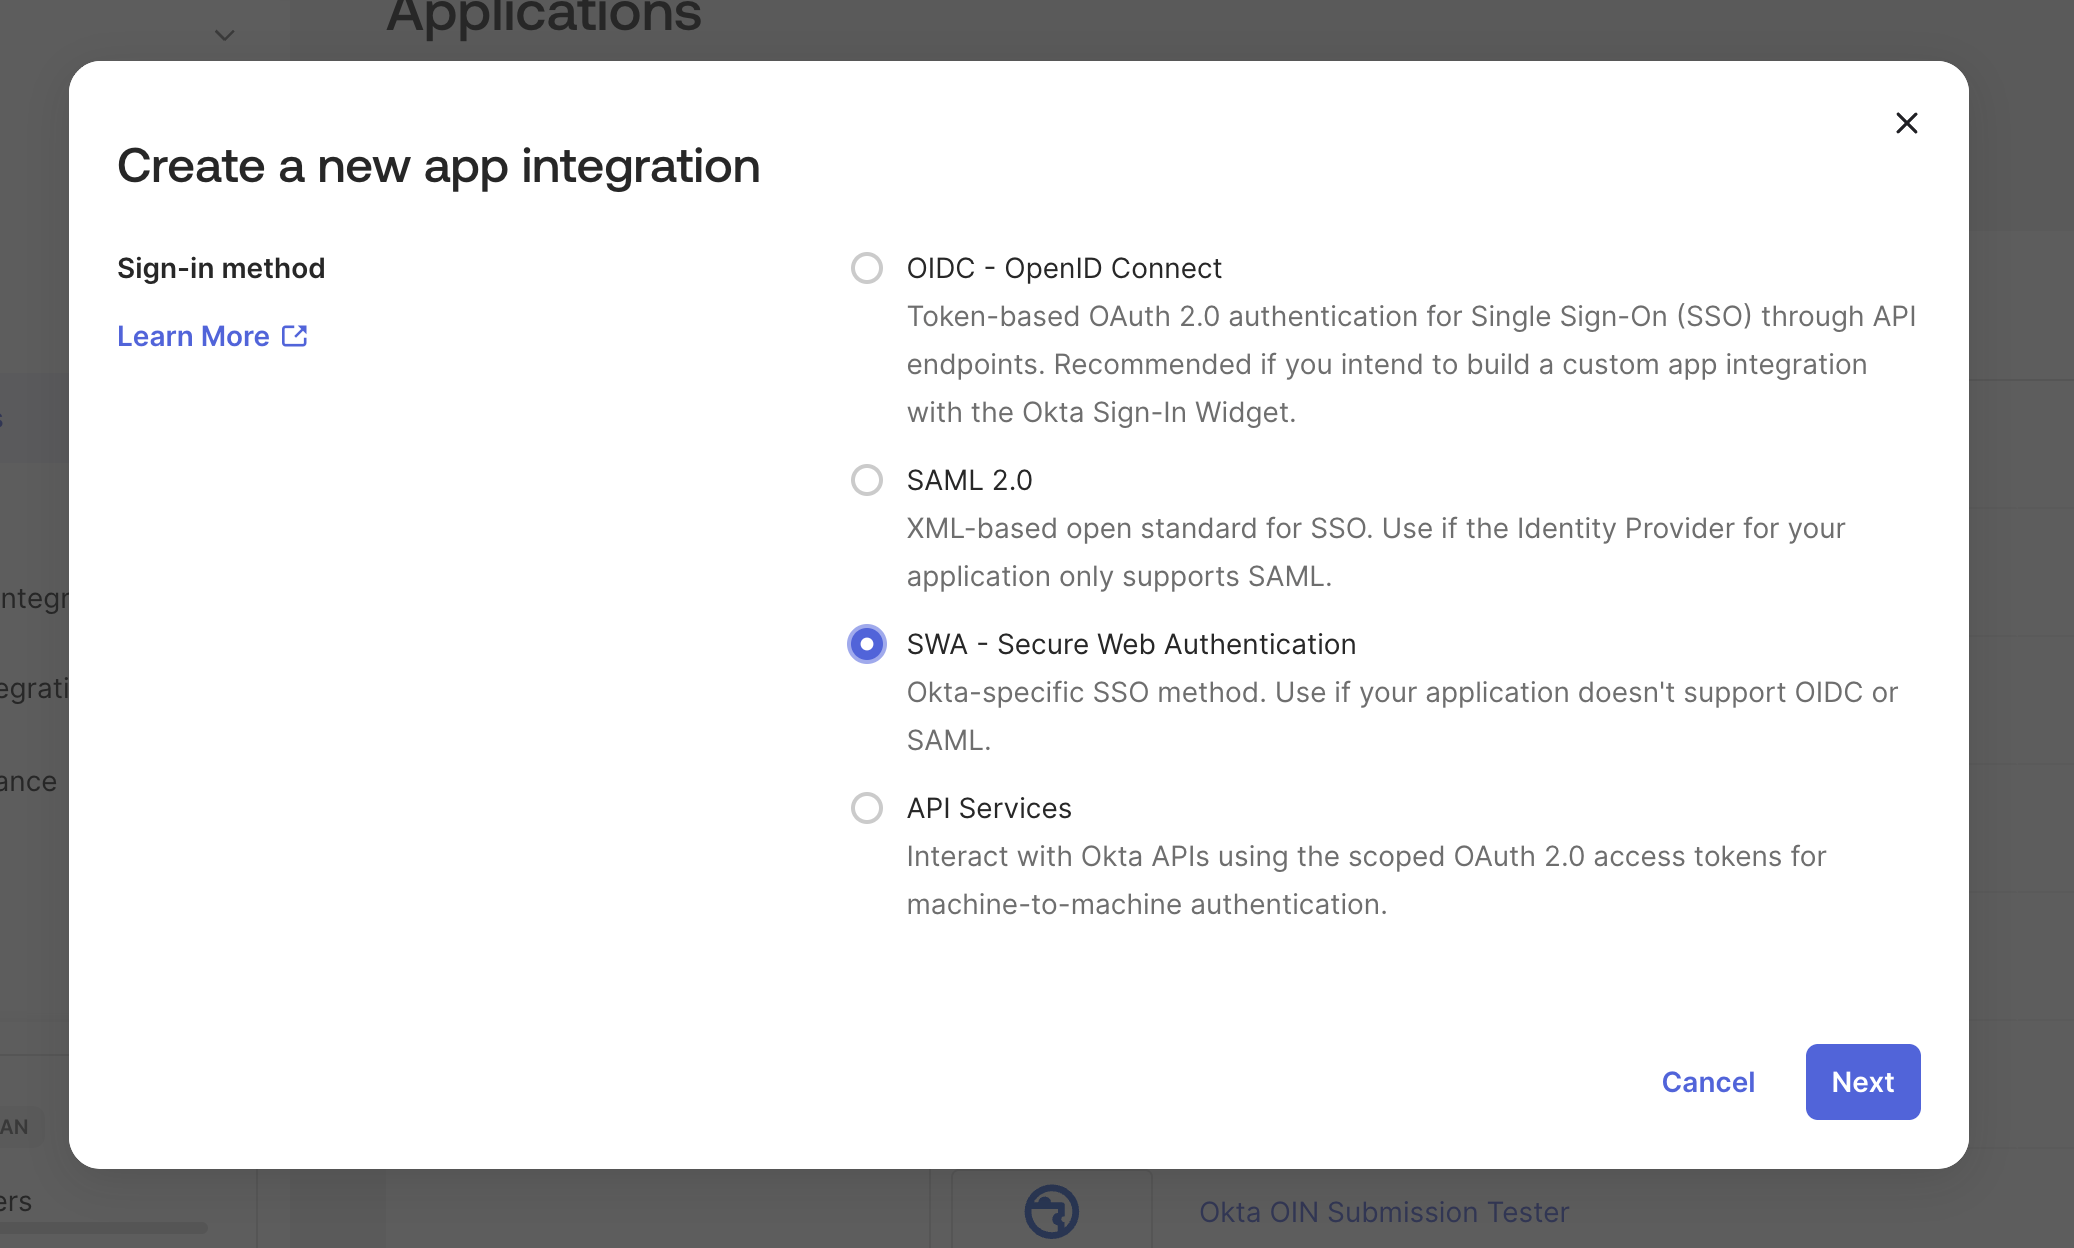
Select SWA - Secure Web Authentication, then select Next. This application provides the SCIM integration; users continue to authenticate to Hive Console through your organization's OIDC provider.
Configure the Application
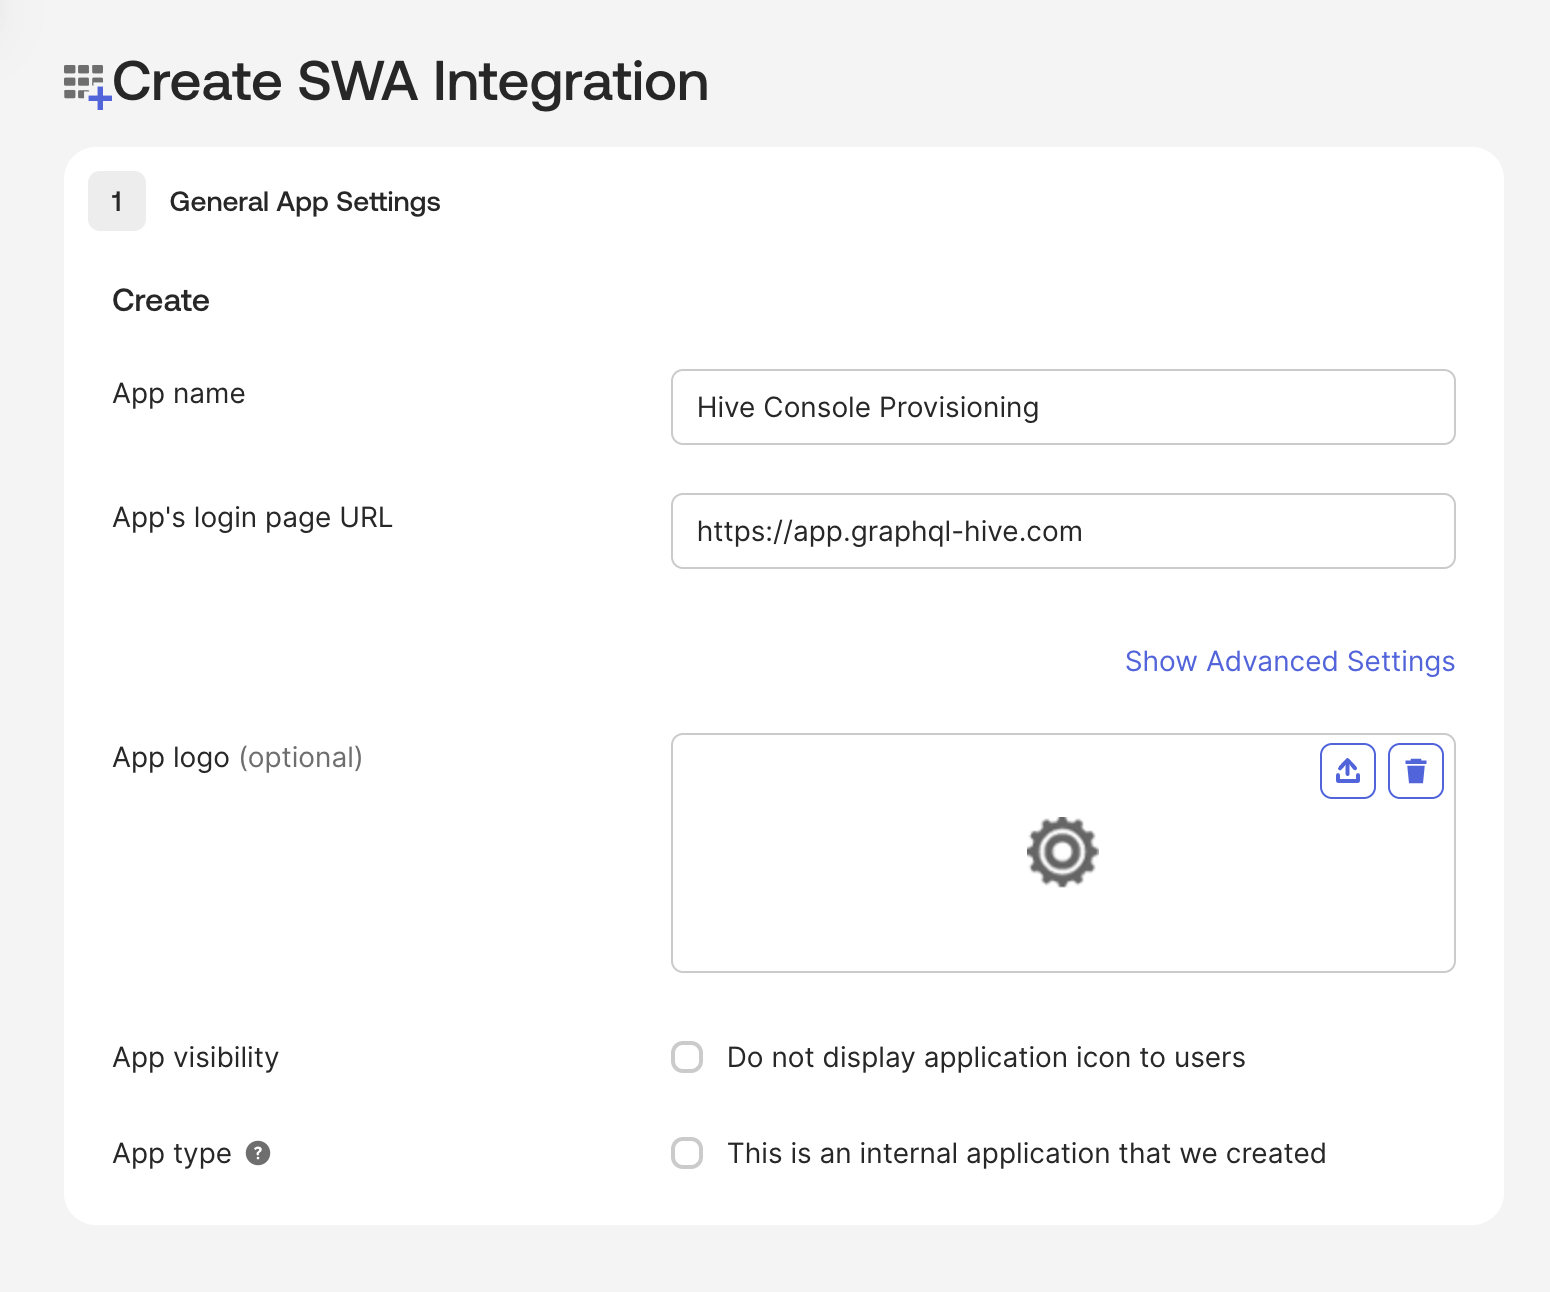
Enter a descriptive app name and the Hive Console URL that users should open. You can use your organization's OIDC sign-in URL so that selecting the application directs users to the correct authentication flow.
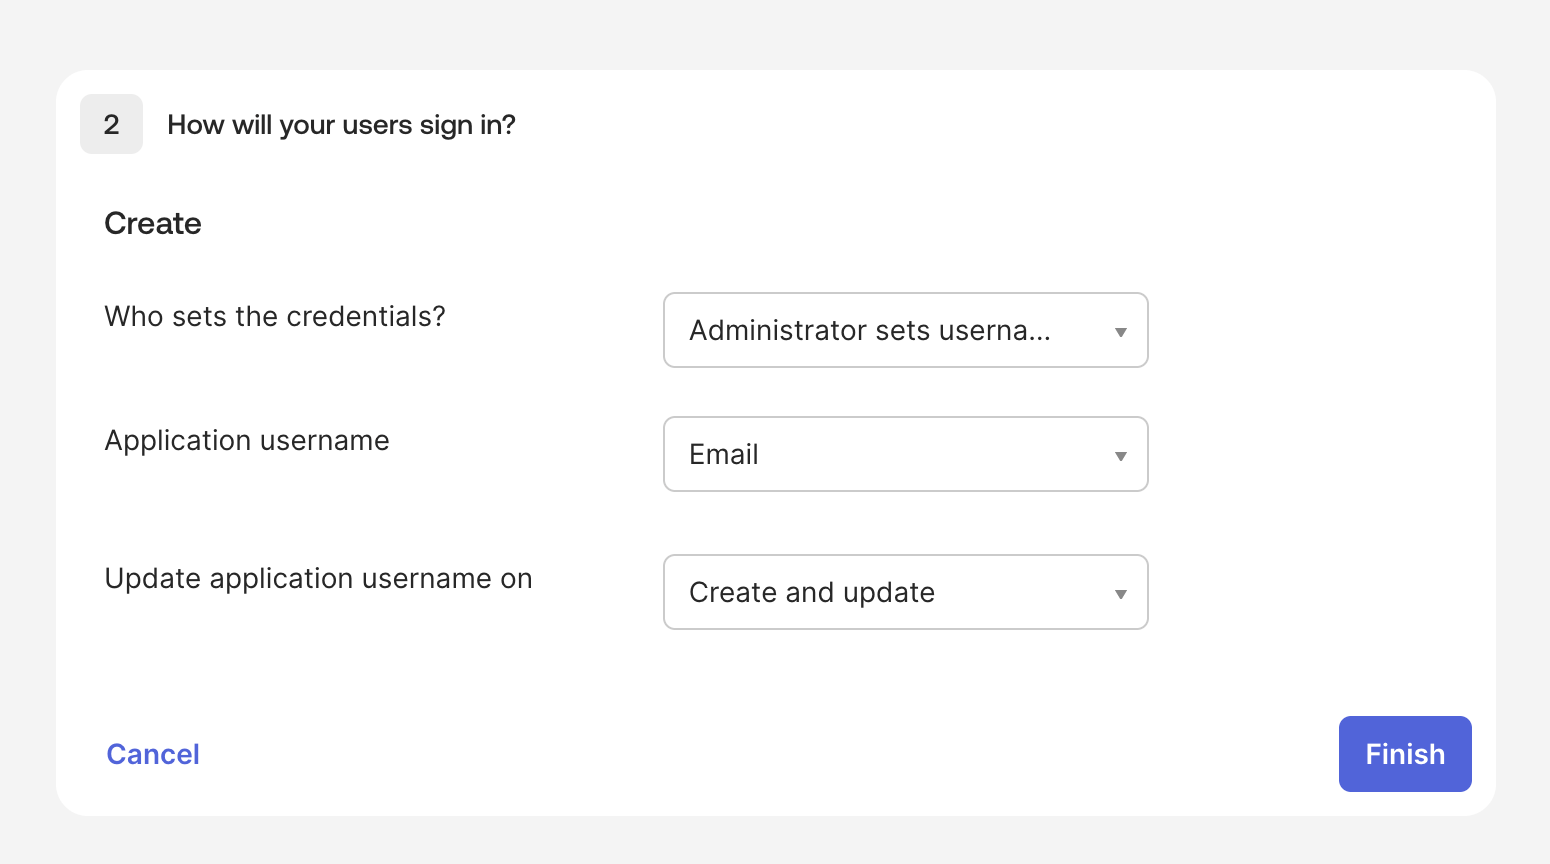
Under How will your users sign in?, use email as the application username and allow Okta to update it when the application is created or updated. Then select Finish.
This sign in configuration is never used in practise, as your users will sign in through SSO. The purpose of this application is sorely to provision users.
Enable SCIM Provisioning
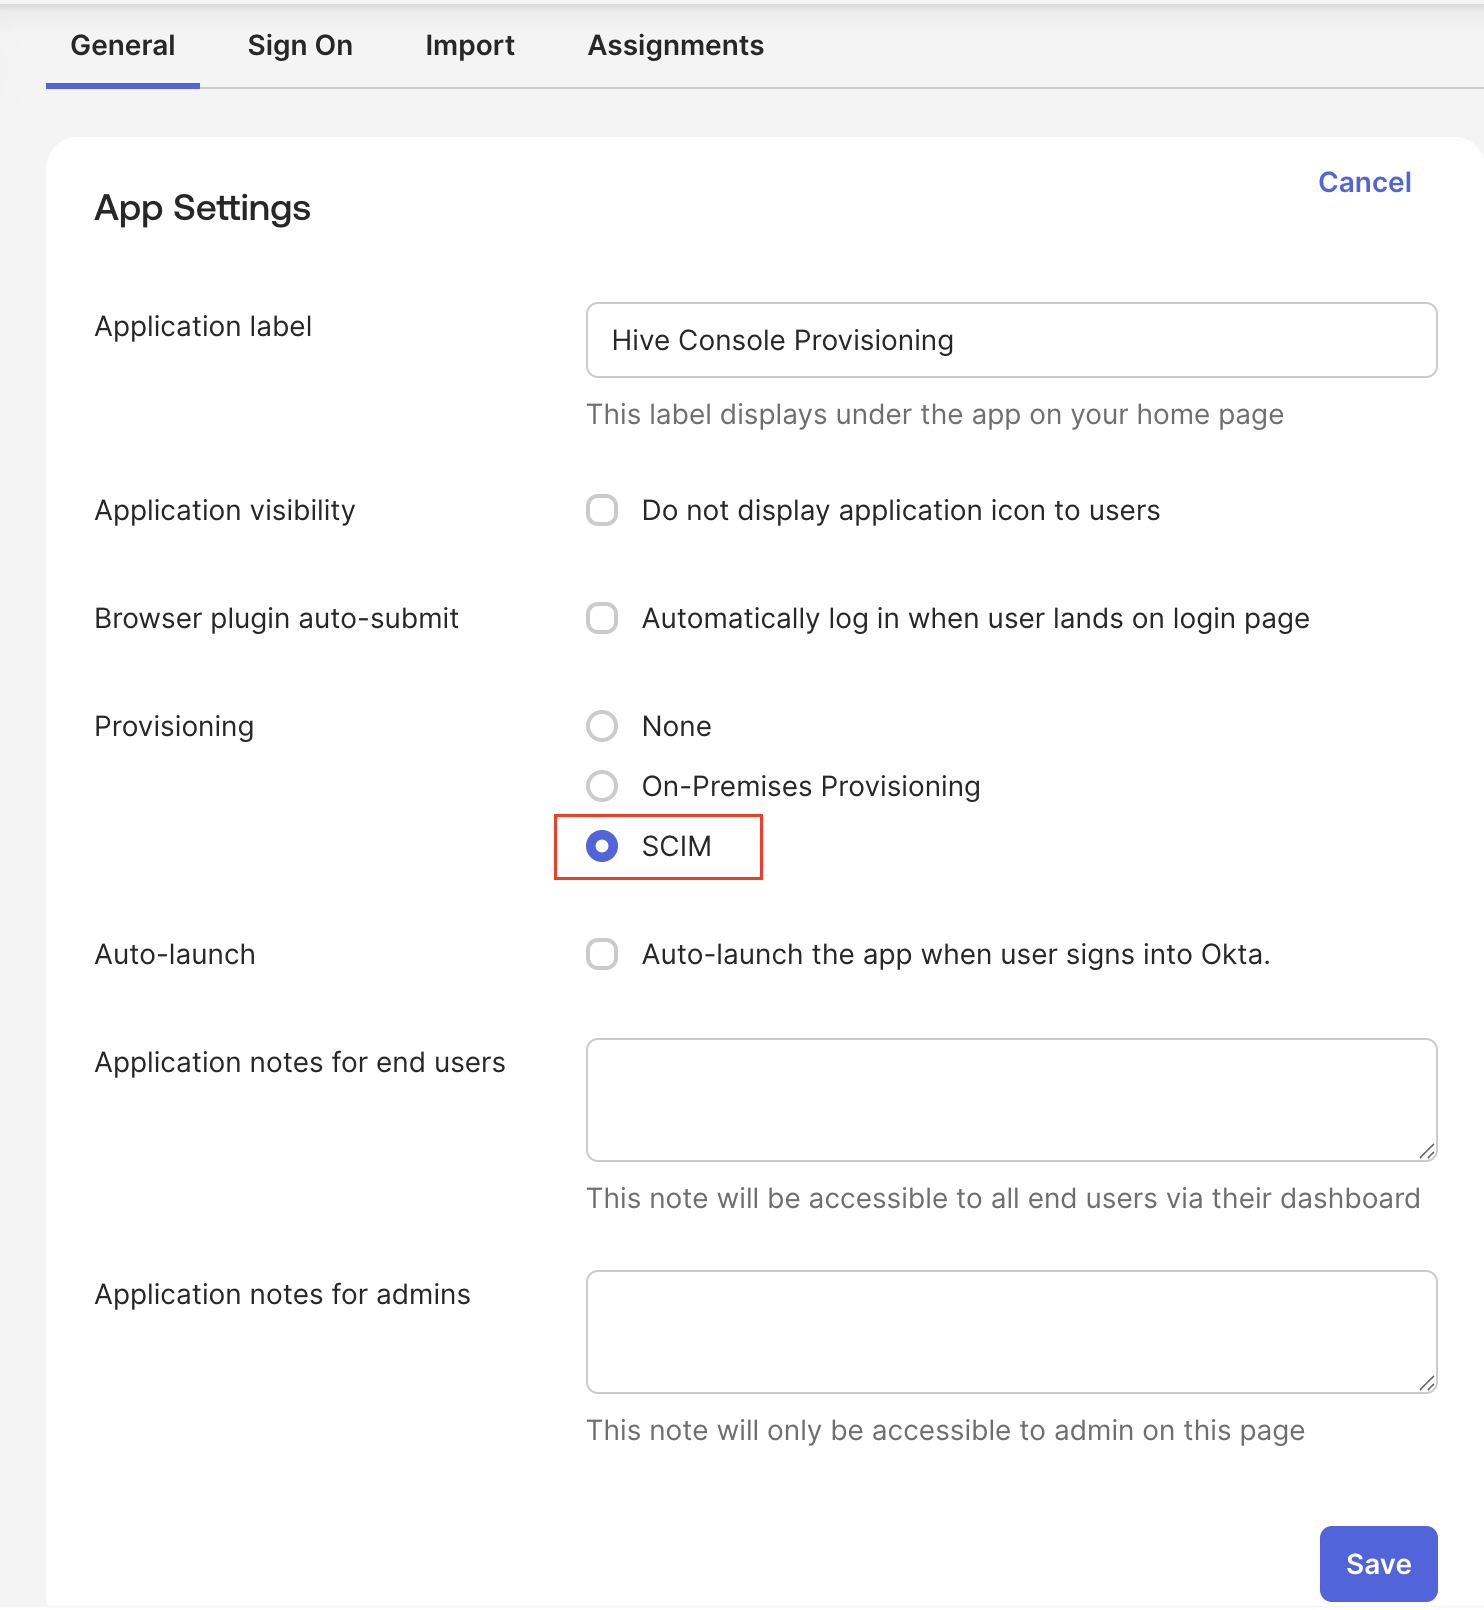
On the application's General tab, edit the app settings. Under Provisioning, select SCIM, then save the configuration. Okta adds a Provisioning tab to the application.
Configure the SCIM Connection
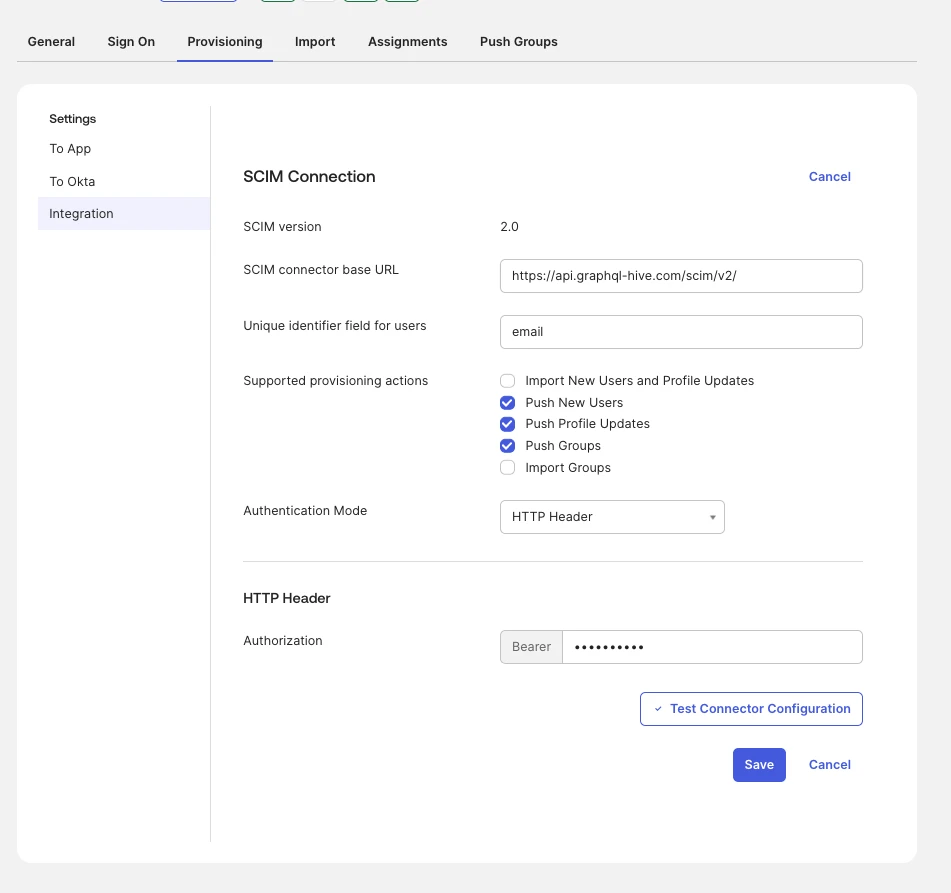
Open Provisioning > Integration, edit the SCIM connection, and enter these values:
| Setting | Value |
|---|---|
| SCIM connector base URL | https://api.graphql-hive.com/scim/v2/ |
| Unique identifier field for users | email |
| Authentication Mode | HTTP Header |
| Authorization | An organization access token with scim:provision granted |
Select the supported provisioning actions shown in the screenshot: Push New Users, Push Profile Updates and Push Groups..
Select Test Connector Configuration. After the connection test succeeds, save the configuration.
Enable User Provisioning Actions
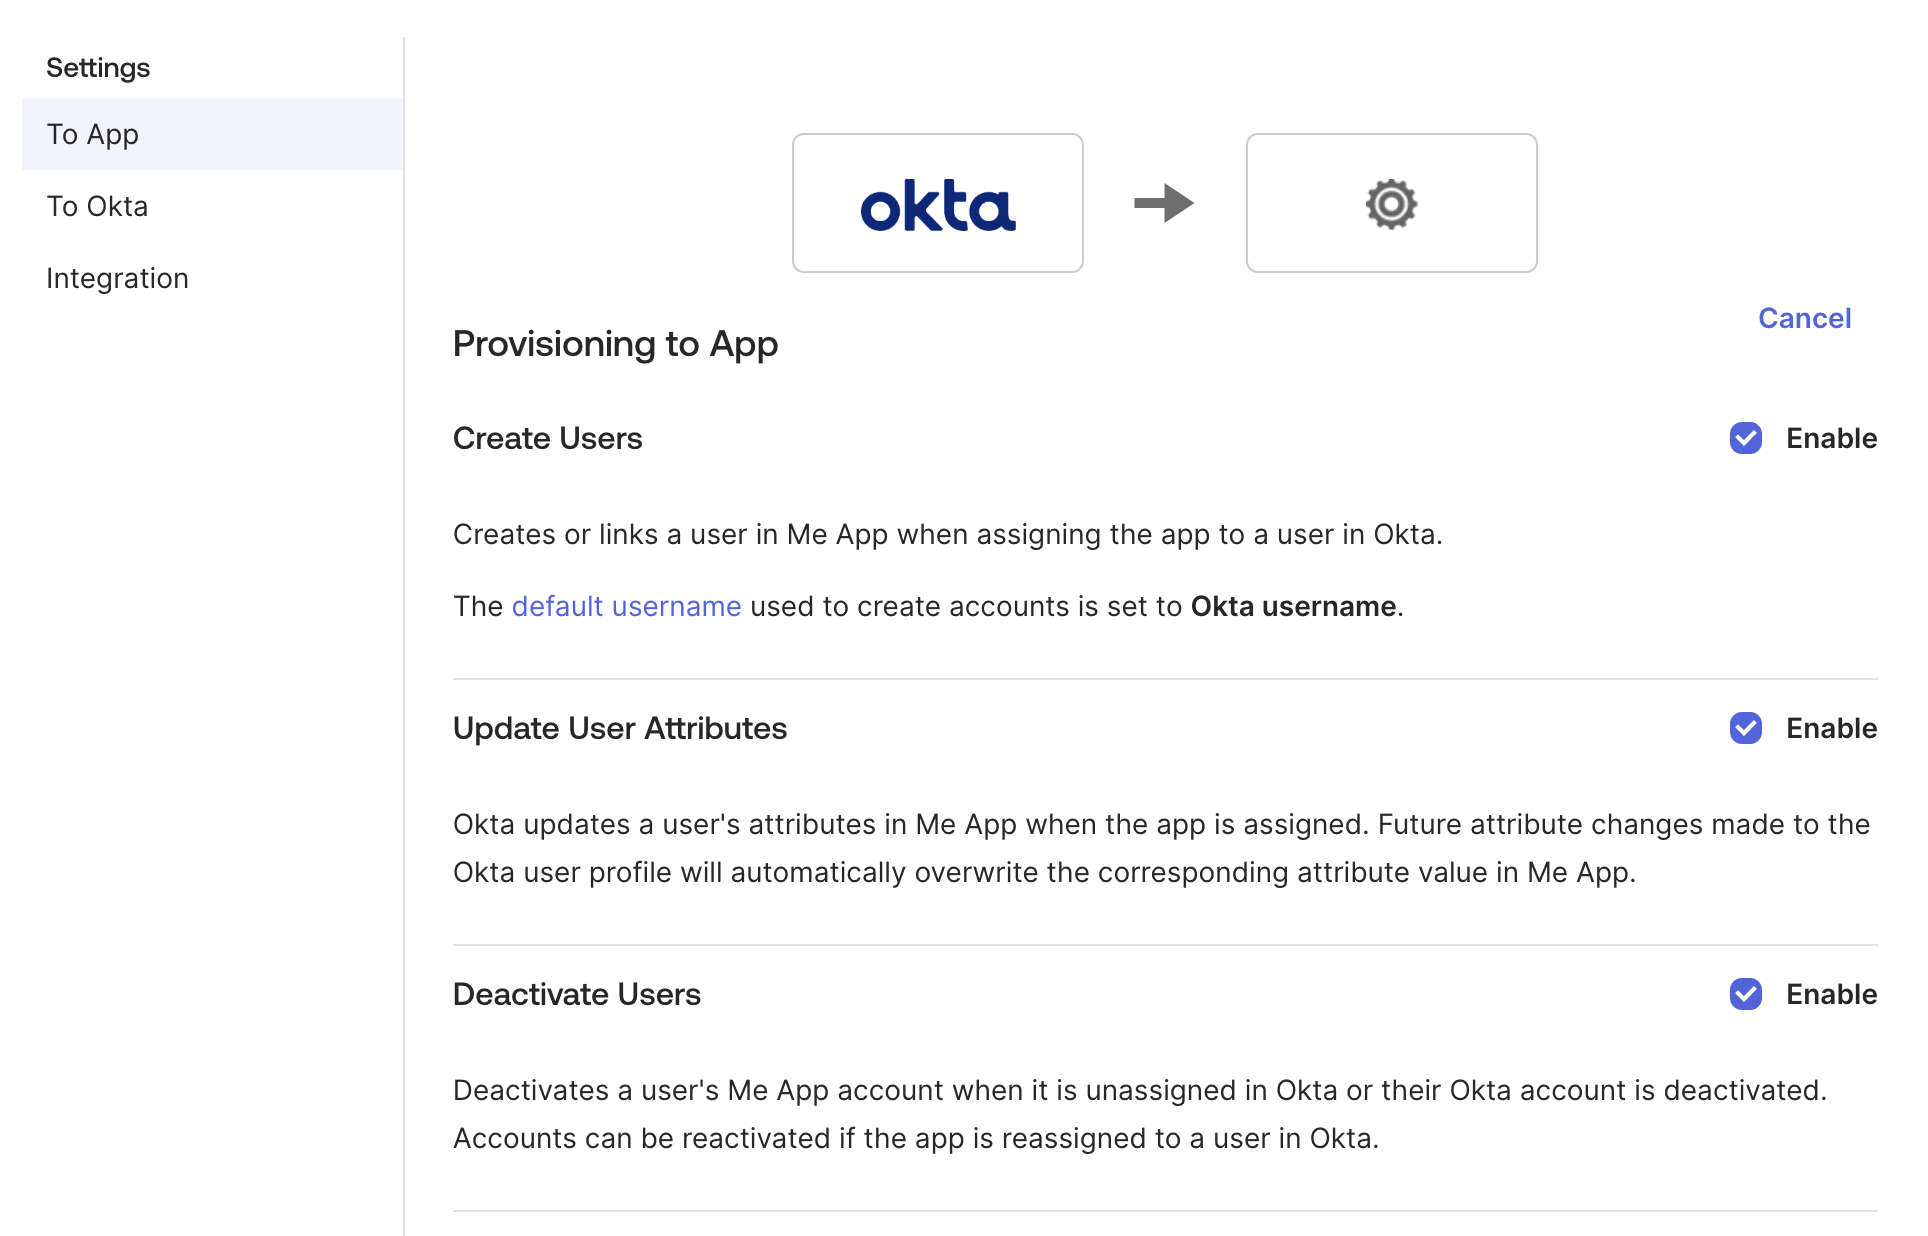
Open Provisioning > To App, edit the settings, and enable these actions:
- Create Users
- Update User Attributes
- Deactivate Users
Verify User Attribute Mappings
On the To App page, verify that the user attributes include these mappings:
| SCIM attribute | Okta value or expression |
|---|---|
userName | The application username configured on the Sign On tab |
givenName | user.firstName |
familyName | user.lastName |
email | user.email |
emailType | (user.email != null && user.email != "") ? "work" : "" |
displayName | user.displayName |
customExternalId | user.getInternalProperty("id") |
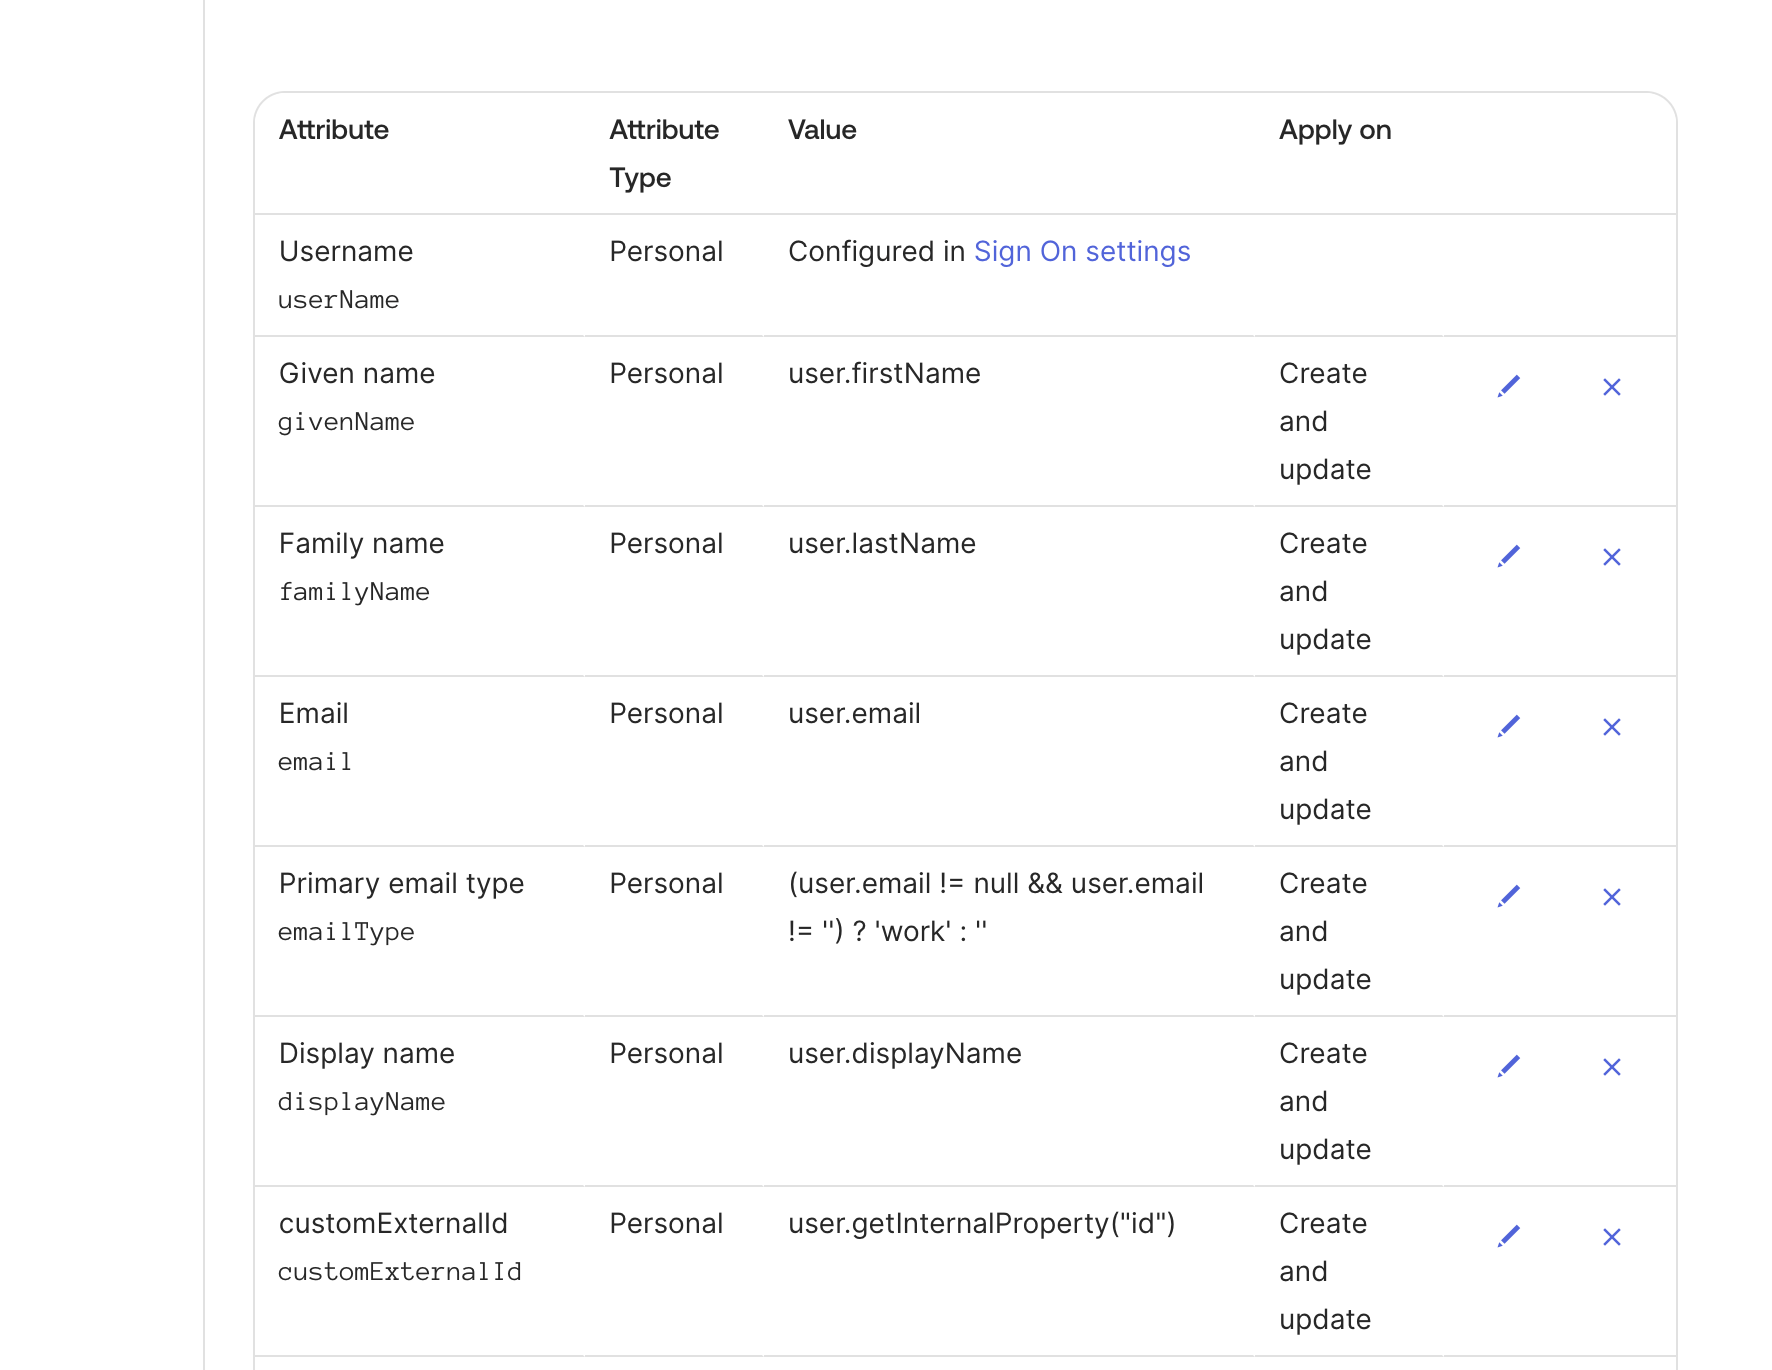
The customExternalId mapping sends the stable Okta user ID as the SCIM externalId. Ensure that
the OIDC claim configured as Hive Console's User ID Claim returns the same Okta user ID, as
described in Match SCIM and OIDC User Identities.
Assign Users and Push Groups
On the application's Assignments tab, assign the users and groups that should access Hive Console. To synchronize group objects and memberships, also configure Push Groups for each group that Hive Console should receive.
The initial synchronization can take some time. When it finishes, the provisioned users and groups appear in Hive Console. Open Members > Groups and create the required role mappings for each provisioned group.
Troubleshooting
A User Cannot Be Provisioned
- Confirm that an OIDC provider is connected to the organization.
- Confirm that the user's email belongs to a domain registered and verified in the OIDC settings.
- Confirm that the SCIM request includes a valid email in
emailsor uses an email address asuserName. - Check for another provisioned user with the same
externalIdoruserName.
A Provisioned User Cannot Sign In
- Confirm that the user is active in the identity provider.
- Compare the user's SCIM
externalIdwith the value returned by the configured OIDC User ID Claim. They must match exactly. - Confirm that the user's email domain is verified and that they are signing in through the organization's OIDC sign-in URL.
A User Can Sign In but Has No Access
- Confirm that the identity provider pushed the user's group memberships.
- Open Members > Groups and confirm that at least one of the user's groups has a role mapping.
- Check that the mapping includes the resources the user is trying to access.
The Identity Provider Connection Test Fails
- Use the base URL ending in
/scim/v2/. - Confirm that the organization access token has not expired or been revoked.
- Confirm that the token has the Provision users and groups (
scim:provision) permission. - Create a new token if the original token value is no longer available.
Identity Provider References
Refer to your identity provider's SCIM documentation for the location and naming of its provisioning settings: